Practical Guide
Master the complete spec-to-code workflow with speckit commands — command reference, end-to-end walkthrough, and best practices
Introduction
In the previous article, we explored the philosophy of spec-driven development — define "what to build" before thinking about "how to build it." While this extra step may seem unnecessary, it dramatically reduces rework and communication overhead in AI-assisted programming.
In this article, we get hands-on. You will learn how to use the speckit command suite to complete the entire workflow from requirements to working code.
Installation and Configuration
Speckit commands originate from GitHub's official Spec Kit project. Depending on your use case, there are several ways to integrate them.
New Project Initialization
For new projects, the recommended approach is to use the official specify-cli tool:
# Install specify-cli using uv
uv tool install specify-cli --from git+https://github.com/github/spec-kit.git

# Initialize a new project, specifying Claude as the AI assistant
specify init my-project --ai claude
This automatically creates the project directory structure, including the .specify/ configuration directory and related template files.
Integrating with an Existing Project
Speckit commands require configuration files to work. To integrate speckit into an existing project, use specify-cli:
cd your-existing-project
specify init . --ai claude  # Note: . refers to the current directory
This creates the following in your project:
your-project/
├── .specify/
│   ├── templates/       # Spec, plan, and other templates
│   ├── scripts/         # Helper scripts
│   └── memory/          # constitution.md
├── .claude/
│   └── commands/        # Claude Code command configs
│       ├── speckit.specify.md
│       ├── speckit.plan.md
│       └── ...
└── specs/               # Feature spec storage directory
The initialization will not overwrite your existing files. Once complete, you can use the /speckit.* command suite in Claude Code.
Note: Speckit commands are not built into Claude Code — you must complete the initialization steps above first. Running
/speckit.specifywithout initialization will result in a "command not found" error.
Command Reference
Speckit provides a set of commands that support each phase of spec-driven development. Each command has well-defined inputs and outputs, forming a traceable chain.
/speckit.specify — Create a Feature Spec
This is the starting point of the entire workflow. You describe the feature you want in natural language, and the AI organizes it into a structured spec document.
Purpose: Create a feature spec from a natural language description
Input: Feature description (natural language)
Output:
specs/[number]-[feature-name]/spec.md— Feature spec document- A new git branch (e.g.,
001-user-auth)
Usage example:
/speckit.specify I want to add a user login feature with email/password authentication and a "remember me" optionAfter execution, the AI will:
- Generate a short feature name (e.g.,
user-auth) - Create a new feature branch
- Produce a spec document with user stories, functional requirements, and success criteria
- Mark unclear areas with
[NEEDS CLARIFICATION]
Core structure of a spec document:
# Feature Specification: User Login

## User Scenarios & Testing
### User Story 1 - User Login (Priority: P1)
Users log into the system using email and password...

**Acceptance Scenarios**:
1. Given valid email and password, When clicking login, Then successfully enter the system

## Requirements
### Functional Requirements
- FR-001: The system must support email/password login
- FR-002: The system must provide a "remember me" option

## Success Criteria
- SC-001: Users can complete the login flow within 30 seconds
Note that the spec document contains no technical details — no mention of frameworks, database schemas, or API definitions. Those come in later phases.
/speckit.clarify — Resolve Ambiguities
After the spec is drafted, there may still be ambiguous areas. This command reviews the spec and asks key questions to help clarify them.
Purpose: Identify ambiguities in the spec and refine it through Q&A
Input: Existing spec.md document
Output: Updated spec.md (with clarification records)
Usage example:
/speckit.clarifyAfter execution, the AI will:
- Scan the spec for ambiguous points
- Prioritize them (Scope > Security > UX > Technical Details)
- Ask one question at a time
- Update the spec based on your answers
Q&A example:
## Question 1: Handling Login Failures

**Context**: The spec mentions user login but does not specify how login failures should be handled.

**Recommended:** Option B - Locking the account after 5 consecutive failures is a security best practice

| Option | Description |
|--------|-------------|
| A | Show error message only, no restrictions |
| B | Lock account for 15 minutes after 5 consecutive failures |
| C | Use CAPTCHA to prevent brute force attacks |

You can reply with an option letter (e.g., "B"), say "yes" to accept the recommendation, or provide your own answer.
After each clarification, the spec document is automatically updated with a clarification record:
## Clarifications

### Session 2025-12-20
- Q: How should login failures be handled? → A: Lock account for 15 minutes after 5 consecutive failures
/speckit.plan — Generate a Technical Plan
Once the spec is clear, you move into the technical design phase. This step produces a technical plan and research report.
Purpose: Generate a technical implementation plan from the spec
Input: spec.md document
Output:
plan.md— Technical plan (architecture, data models, API design)research.md— Research report (technology selection decisions)data-model.md— Data model (if applicable)contracts/— API contracts (if applicable)
Usage example:
/speckit.plan I'm using Next.js + Prisma + PostgreSQLYou can append your tech stack preferences after the command. After execution, the AI will:
- Analyze the functional requirements from the spec
- Research best practices for the relevant technologies
- Design data models and API structures
- Produce a complete technical plan
Core content of a technical plan:
# Implementation Plan: User Login

## Technical Context
**Language/Version**: TypeScript 5.x
**Primary Dependencies**: Next.js 15, Prisma, PostgreSQL
**Authentication**: NextAuth.js with credentials provider

## Project Structure
src/
├── app/
│   └── (auth)/
│       ├── login/
│       └── api/auth/
├── lib/
│   └── auth/
└── prisma/
    └── schema.prisma

## Data Model
- User: id, email, passwordHash, createdAt, updatedAt
- Session: id, userId, expiresAt
/speckit.tasks — Break Down Tasks
With the technical plan in place, the next step is to decompose it into an actionable task list.
Purpose: Split the technical plan into an executable task list
Input: plan.md document
Output: tasks.md — Task list sorted by dependencies
Usage example:
/speckit.tasksAfter execution, the AI will:
- Extract the technical approach from plan.md
- Extract user story priorities from spec.md
- Generate tasks grouped by user story
- Mark parallelizable tasks with
[P] - Specify concrete file paths for each task
Task list format:
## Phase 1: Setup
- [ ] T001 Create project structure
- [ ] T002 [P] Configure Prisma schema
- [ ] T003 [P] Configure NextAuth

## Phase 2: User Story 1 - User Login (P1)
- [ ] T004 [US1] Create User model in prisma/schema.prisma
- [ ] T005 [US1] Implement login API in src/app/api/auth/[...nextauth]/route.ts
- [ ] T006 [US1] Create login page in src/app/(auth)/login/page.tsx
Each task includes:
- Task ID (T001, T002...) — for tracking
- [P] marker — indicates it can run in parallel with other [P] tasks
- [US] tag — indicates which user story it belongs to
- File path — specifies exactly which file to work on
/speckit.implement — Execute Implementation
Everything is ready — time to execute the task list.
Purpose: Execute tasks from the task list one by one
Input: tasks.md document
Output: Actual code
Usage example:
/speckit.implementBefore execution, the AI checks the checklist (if one exists). During execution:
- Tasks are executed in phase order
- Each completed task is marked as
[X] - Task dependencies are respected
- Parallel tasks can run simultaneously
Execution example:
Phase 1: Setup
✓ T001 Create project structure
✓ T002 Configure Prisma schema
✓ T003 Configure NextAuth

Phase 2: User Story 1
✓ T004 Create User model
Executing T005...
Post-Implementation Review
After /speckit.implement finishes, do not merge the code directly. AI-generated code requires human review:
Required verification steps:
-
Run the test suite
npm test # or your test commandEnsure the AI hasn't broken existing functionality.
-
Code review checklist
- Does the code match the spec's intent (cross-reference spec.md)?
- Does it follow the project's coding style?
- Are there any potential security issues?
-
Boundary testing Manually test edge cases the AI may have missed:
- Null value handling
- Extreme inputs
- Concurrency scenarios
- Error paths
-
Performance check If database operations or API calls are involved, check for N+1 queries and similar performance issues.
Tip: Even with a thorough spec, the AI may still deviate in implementation details. Review is not a sign of distrust in spec-driven development — it is part of engineering discipline.
/speckit.analyze — Consistency Analysis
This is an optional quality check step that verifies consistency across the spec, plan, and tasks.
Purpose: Cross-document consistency and quality analysis
Input: spec.md, plan.md, tasks.md
Output: Analysis report (no files are modified)
Usage example:
/speckit.analyzeAfter execution, it checks:
- Whether every requirement has a corresponding task
- Whether tasks cover all user stories
- Whether terminology is consistent
- Whether there are gaps or duplications
Other Commands (Optional)
In addition to the core commands above, speckit provides several auxiliary commands. These are not part of the main workflow but are useful in specific scenarios.
/speckit.constitution — Create a Project Constitution
Used to define development principles and standards for the project. Ideal for team projects to ensure all members follow unified development standards.
- Input: Interactive Q&A or directly provided principles
- Output:
.specify/constitution.mdproject constitution file - Use case: New team project initialization, unifying coding style and architectural decisions
/speckit.checklist — Generate a Quality Checklist
Generates a customized quality checklist based on the feature spec, used for pre-implementation quality assurance.
- Input: spec.md document
- Output: Checklists in the
checklists/directory - Use case: Quality gates before important feature launches, code review reference
/speckit.taskstoissues — Convert Tasks to GitHub Issues
Automatically converts tasks from tasks.md into GitHub Issues for team collaboration and task assignment.
- Input: tasks.md document
- Output: GitHub Issues (created via the gh CLI)
- Use case: Team collaboration, sprint planning, task tracking
Tool Ecosystem
The speckit commands introduced in this article come from the GitHub Spec Kit project. Beyond this, in 2025, several major AI coding tools began supporting similar spec-driven workflows:
| Tool | Features | Best For |
|---|---|---|
| GitHub Spec Kit | The tool used in this article, MIT licensed, supports Claude Code / Copilot / Gemini CLI | Command-line users, cross-tool collaboration |
| AWS Kiro | VS Code fork, visual workflow, EARS notation | GUI-oriented users, AWS ecosystem |
| JetBrains Junie | IntelliJ ecosystem integration, Think More reasoning mode | JetBrains IDE users |
| Cursor Plan Mode | Built-in planning phase, auto-generated execution plans | Developers already using Cursor |
How to choose:
- If you use Claude Code, GitHub Copilot, or Gemini CLI, GitHub Spec Kit is recommended
- If you prefer graphical interfaces and visual workflows, try AWS Kiro
- If you are a JetBrains user, Junie offers more natural IDE integration
- If you are already using Cursor, its Plan Mode provides similar planning capabilities
The core philosophy is the same — the tool is just the vehicle; what matters is the spec-first, code-second mindset.
End-to-End Walkthrough
Let us walk through a real-world example using the complete speckit workflow.
Scenario: Add an article bookmarking feature to a blog system
Step 1: Create the Spec
/speckit.specify I want to add an article bookmarking feature so users can save their favorite articles and view them in their profileThe AI generates the spec document specs/002-article-bookmark/spec.md:
# Feature Specification: Article Bookmarking

## User Scenarios & Testing

### User Story 1 - Bookmark an Article (Priority: P1)
While reading an article, the user clicks the bookmark button to add it to their bookmark list.

**Acceptance Scenarios**:
1. Given the user is logged in, When clicking the bookmark button, Then the article is added to the bookmark list
2. Given the user is not logged in, When clicking the bookmark button, Then a login prompt is shown

### User Story 2 - View Bookmark List (Priority: P2)
The user views all their bookmarked articles in their profile.

## Requirements
- FR-001: Users must be able to bookmark/unbookmark articles
- FR-002: The bookmark button must reflect the current bookmark state
- FR-003: The profile must display the bookmark list

## Success Criteria
- SC-001: Bookmark operations complete within 500ms
- SC-002: The bookmark list supports pagination with 10 articles per page
Step 2: Clarify Requirements
/speckit.clarifyThe AI asks: "Is there an upper limit on the number of bookmarks?"
Answer: "A maximum of 100 bookmarked articles per user"
The spec is updated with:
- FR-004: Each user can bookmark a maximum of 100 articles
- A notification is displayed when the limit is reached
Step 3: Generate the Plan
/speckit.plan Using Next.js + PrismaThe generated technical plan includes:
- Bookmark model (userId, articleId, createdAt)
- API route design (POST/DELETE /api/bookmarks)
- Component design (BookmarkButton, BookmarkList)
Step 4: Break Down Tasks
/speckit.tasksThe generated task list:
## Phase 1: Setup
- [ ] T001 Add Bookmark model to Prisma schema

## Phase 2: US1 - Bookmark Article
- [ ] T002 [US1] Create bookmark API in src/app/api/bookmarks/route.ts
- [ ] T003 [US1] Create BookmarkButton component in src/components/BookmarkButton.tsx
- [ ] T004 [US1] Integrate into article page

## Phase 3: US2 - Bookmark List
- [ ] T005 [US2] Create bookmark list page in src/app/profile/bookmarks/page.tsx
- [ ] T006 [US2] Implement pagination logic
Step 5: Execute Implementation
/speckit.implementTasks are executed in order, with each completed task marked as [X].
Best Practices and Considerations
When to Use Speckit
Good fit:
- New feature development (involving 3+ files)
- When requirements are not fully clear (use clarify to resolve)
- Multi-person collaborative projects (specs serve as shared understanding)
- Critical features (where traceability is needed)
Not a good fit:
- Simple bug fixes
- One-line code changes
- Emergency hotfixes
- Purely exploratory experiments
Common Pitfalls
There are several common pitfalls to watch out for when using speckit:
Pitfall 1: Specs that are too vague
Symptom: AI-generated code diverges significantly from expectations, requiring extensive rework.
# ❌ Vague spec
Users can search for articles

# ✓ Clear spec
- FR-001: Users can search articles by title keywords
- FR-002: Search results are sorted by relevance, showing 10 per page
- FR-003: Search terms are highlighted in the results
- FR-004: An empty search term displays trending articles
Solution: Run /speckit.clarify, or manually add functional requirements and success criteria.
Pitfall 2: Specs that are too detailed
Symptom: The AI is over-constrained and cannot leverage its strengths, producing rigid code — or it simply ignores parts of the instructions.
# ❌ Over-specified (dictating implementation details)
Use lodash's debounce function with a 300ms delay,
wrapped in useCallback with [searchTerm] as a dependency...

# ✓ Appropriate level of detail (only state what, not how)
Search input should be debounced to avoid excessive requests
Solution: Keep specs at the "what" level and leave "how" for the Plan phase.
Pitfall 3: Skipping the Plan phase
Symptom: Tasks are too coarse or too fragmented, leading to frequent rework during implementation and tangled dependencies between tasks.
Solution: Always complete the Plan phase for complex features. Planning not only produces a technical approach but also helps identify potential architectural issues.
Pitfall 4: Merging without review
Symptom: Edge cases, security vulnerabilities, or performance issues are discovered after deployment.
Solution: Refer to the "Post-Implementation Review" section above — always run tests and perform code review before merging.
Frequently Asked Questions
Q: Do I need to go through the entire workflow for every feature?
Not necessarily. Simple changes can go straight to code. For complex features, completing at least specify + plan is recommended.
Q: The spec is very detailed, but the AI still generated unexpected code?
Check whether the spec is truly "detailed." Often we think we have been clear, but ambiguities remain. Try running /speckit.clarify to see if anything was missed.
Q: Can I skip certain steps?
Yes. The minimal workflow is specify → tasks → implement. However, skipping clarify and plan may increase the risk of rework later.
Q: How do I modify an already-generated spec?
Simply edit the spec.md file directly. After making changes, it is recommended to re-run plan and tasks to maintain consistency.
Q: The AI-generated code is completely wrong — how do I debug?
Troubleshoot in stages:
- Check the spec: Is the spec truly clear? Try running
/speckit.clarifyto see if anything was missed - Check the plan: Is the technical approach in plan.md reasonable? If not, edit it directly and regenerate tasks
- Narrow the scope: Have the AI execute just one task and observe whether the output meets expectations
- Add constraints: Add more explicit technical preferences in constitution.md
Q: What if the Plan and Tasks are inconsistent?
Run /speckit.analyze to detect inconsistencies. Common causes:
- Plan was updated but Tasks were not regenerated
- Tasks were manually edited without updating the Plan
- Spec changed but only some documents were updated
Solution: Treat spec.md as the source of truth and regenerate plan.md and tasks.md in sequence.
Q: How do I handle cross-feature dependencies?
If Feature B depends on Feature A, there are two approaches:
- Merge specs: Write A and B into the same spec.md so the AI plans them together
- Develop in phases: Complete Feature A's full workflow first, then start Feature B's specify
It is not recommended to develop multiple features with dependencies simultaneously, as this easily leads to integration issues.
Summary
The core value of speckit is not adding process for its own sake — it is about making implicit knowledge explicit. When you are required to write down user stories, functional requirements, and success criteria, the details you thought were "obvious" surface naturally.
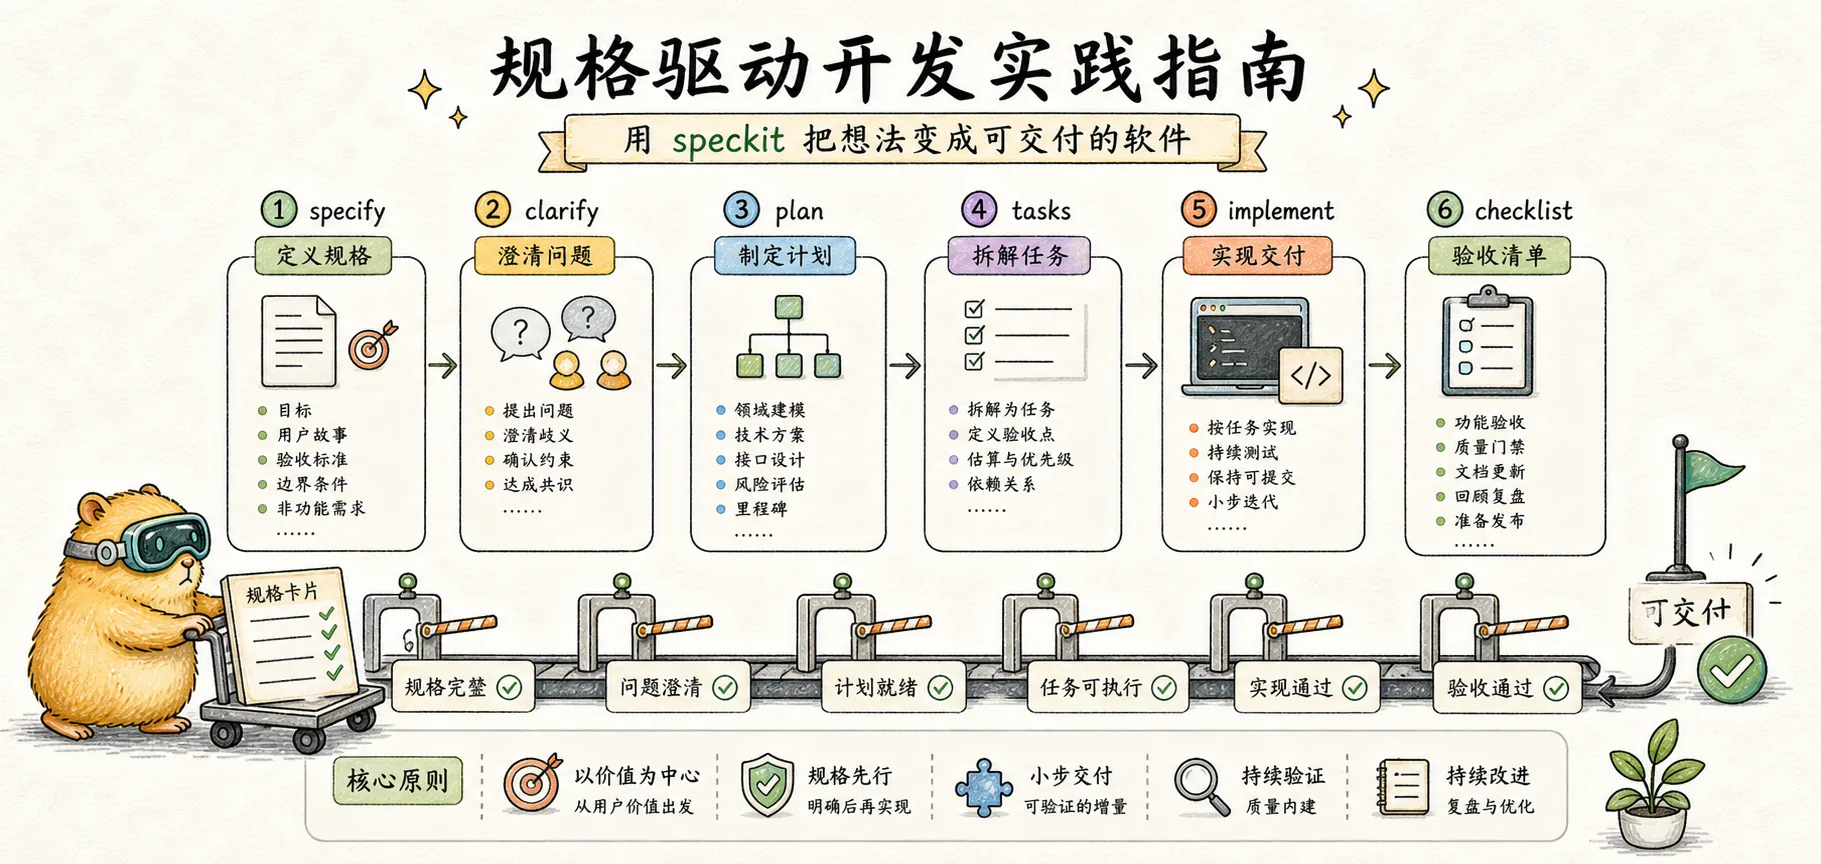
Remember this workflow:
Specify → Clarify → Plan → Tasks → Implement
 Define    Refine   Design  Break    Execute
                            Down
Each step reduces ambiguity for the next. Ultimately, the AI receives a clear task list instead of a vague description of intent.
Now, go back to your project and try starting your first spec-driven development workflow with /speckit.specify.
Further Reading
- What is Spec-Driven Development — Revisit the core philosophy
- GSD Deep Dive — Another context engineering system built on spec-driven principles
- What are Claude Skills — Speckit itself is a Claude Skill
Comments
Concept Introduction
From Vibe Coding to spec-driven development: understanding how AI programming evolves from 'intuition' to 'engineering', and mastering the new paradigm of writing specs before code
Ralph Wiggum Deep Dive
Understanding the core principles of Ralph technique — why a simple bash loop can let AI write code while you sleep